
You love them, you hate them — the plank is the true test of core strength. This ultimate isometric exercise engages the muscles in your abdominals, lower back, hips and arms. It’s not a surprise that many workouts begin and end with a some variation of a plank challenge. But do you find yourself lowering your hips or arching your back after a few seconds of holding it together? We feel you.
That’s why we tapped Gregg Cook, Daily Burn 365 trainer, to share his expert tips on how to do a proper plank. Plus, you’ll get tips on how to make planks more challenging as you get stronger.
“If you’re new to planks, you can start by doing an incline push-up on a chair. This is actually a more preferable modification than going on your knees because you’re engaging the muscles you’ll need to do a proper straight-arm plank,” Cook explains.
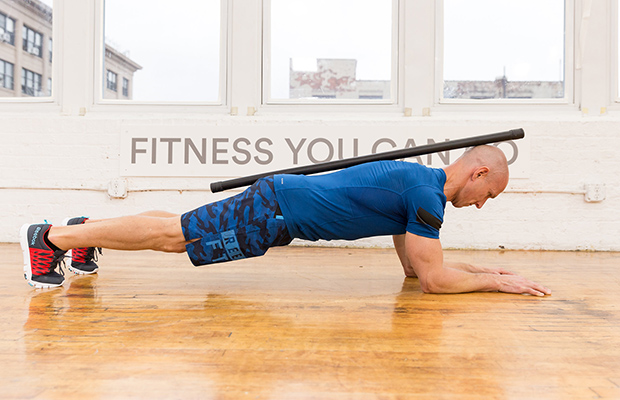
Or, you can try holding your plank for 10 to 15 seconds and gradually build your way to 60 seconds, Cook recommends. Some people choose to do planks on their forearms before pushing up to their hands. If this is your preferred stance, it’s important to keep your hands shoulder-distance apart, arms forming a right angle to the floor. Your shoulders should also be in line with your hands and not in front of them.
Here are also some other common plank mistakes people make, and how to correct them.
The 3 Most Common Plank Mistakes
Mistake #1: Arching your back
If your abdominals aren’t engaged, your arms will tire out from supporting the majority of your bodyweight. When that happens, your first inclination is to arch your back, which puts undue pressure on your spine.

How to fix it: “There’s a lot of unnecessary shrugging that occurs when holding a plank. Make sure your shoulders are depressed (wide) and that your palms are also wide on the floor,” Cook says. By broadening your shoulders, you will take weight off of your upper body and engage those core muscles that need to be working.

Mistake #2: Lowering your hips
When your abdominal and arm muscles start to fatigue, it’s likely your hips will begin to sink. (Gravity, ladies and gentlemen!) The downside to letting it all hang down: Your core muscles will be less challenged in this position, and you’ll be putting strain on your lower back. Not the goal here.
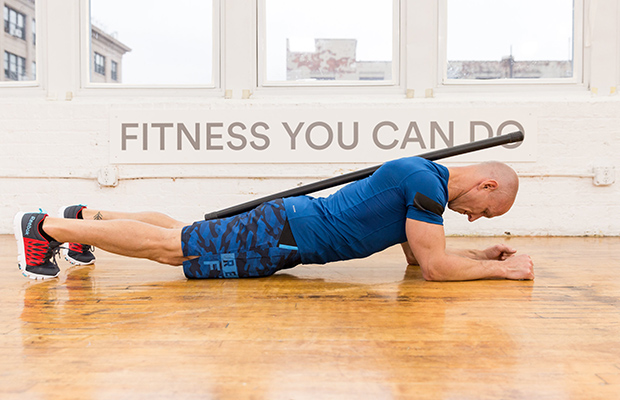
How to fix it: Cook says to keep your hips raised by tucking your butt in a little and squeezing your glutes. You can also walk your feet out apart from each other a bit to give yourself a more stable and solid base. Take deep breaths as you contract and engage your abdominal muscles. No clue if you’re getting it right? You can use a bar as an alignment check.
Mistake #3: Looking straight ahead or up
Another common mistake is cranking your head too far back looking up at the ceiling or straight ahead. This can put a strain on your neck, and as a result, the rest of your form will fall apart.
How to fix it: Keep your eyes looking down at the floor or mat so your head and neck are in alignment with the rest of your body. Cook also suggests thinking about drawing your chin in towards you — especially when you hit that 60-second mark. Gritting teeth, optional.
What Is a Plank?
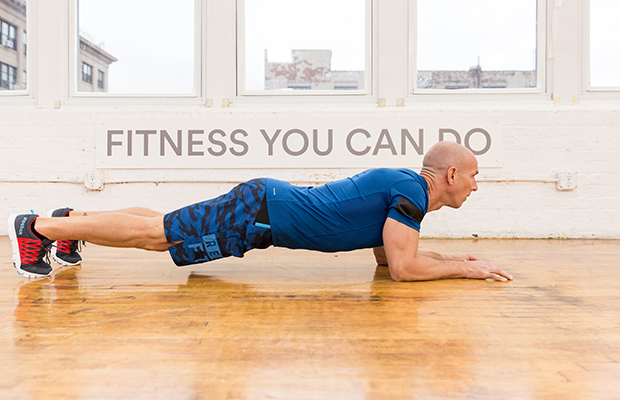
A plank is an isometric exercise where you hold your body off the ground, balancing on your forearms and toes. Your spine stays in a neutral position, and your head, torso, and legs align in a straight line. Because you maintain muscle contraction without movement, planking is considered an isometric exercise.
How to Perform a Plank
To get started, find a space where you can fully extend your body. An exercise or yoga mat will provide cushioning for comfort. You can choose to perform the plank on your palms or forearms.
Step 1: Begin face down on the floor, supporting your body with your forearms and toes. Position your elbows directly under your shoulders with your forearms facing forward. Keep your head relaxed and gaze down at the floor.
Step 2: Engage your abdominal muscles by pulling your belly button toward your spine. Keep your torso straight and rigid, forming a straight line from your ears to your toes without sagging or bending. Ensure your shoulders are down and not creeping up toward your ears. Your heels should be over the balls of your feet.
Step 3: Hold this position for 10 seconds to start. Then, gently lower your body back to the floor.
Step 4: As you build strength, gradually increase the duration to 30, 45, or even 60 seconds.
Benefits of Planking
Planking offers numerous physical benefits:
- Core Strength: A strong core stabilizes, balances, and powers the body during almost every activity.
- Improved Posture: Strengthening core muscles can lead to better posture by supporting the spine.
- Joint Stress Reduction: A robust core can alleviate stress on joints during movements.
- Calorie Burn: While primarily a strength exercise, planking engages multiple muscle groups, which can boost calorie expenditure.
Plank Modifications and Variations
Modifications for Beginners
1. Tabletop Plank
- Start on all fours in a tabletop position.
- Actively press into your hands and engage your abdominal muscles.
- Keep your spine neutral.
- Optionally, tuck your toes and lift your knees slightly off the floor to reduce pressure on your feet.
2. Incline Plank
- Place your forearms or palms on an elevated surface like a bench or step.
- Ensure your elbows are directly under your shoulders.
- Walk your feet back until your body forms a straight line at an incline.
- Engage your abs and slightly tuck your tailbone.
Advanced Variations
1. Plank with Leg Lift
- Begin in a standard plank position.
- Slowly lift one leg 5 to 8 inches off the floor.
- Hold for two seconds, then lower it back down.
- Alternate legs and repeat.
- Aim for two to three sets of 10 reps.
2. Plank with Arm Lift
- Start in a plank position.
- Shift your weight to one forearm or palm.
- Extend the opposite arm straight out in front.
- Hold for three seconds while keeping your core tight.
- Return to the starting position and switch arms.
- Perform two to three sets of 10 reps.
3. Shorter Plank Sets
- Hold a plank for 10 to 15 seconds.
- Rest for 30 seconds.
- Repeat for three to five sets.
- Keep total planking time under 60 seconds per session.
Common Mistakes to Avoid
- Arching the Back: This indicates insufficient abdominal engagement and places extra weight on your arms. Keep shoulders down and abs tight.
- Sagging Hips: If your hips start to sag, it’s a sign of core fatigue. Rest and reset your form.
- Tilting the Head Up: Keep your neck aligned with your spine to avoid strain. Your gaze should be downward.
Safety and Precautions
- Shoulder Injuries: Avoid planks if you have shoulder issues. Consult a healthcare professional for alternative exercises.
- Pregnancy: Planks can be safe during pregnancy but may stress the abdominal wall. Consider modifications like side or incline planks. Always consult your doctor or a physical therapist.
Frequently Asked Questions
What Muscles Do Planks Work?
Planks target the entire core, including:
- Rectus Abdominis: The front abdominal muscles.
- Transverse Abdominis: Deep core muscles that act like a corset.
- Obliques: Muscles along the sides of the abdomen.
- Erector Spinae: Muscles along the spine.
- Shoulder Stabilizers: Support the shoulders.
- Gluteus Maximus: The main buttock muscles.
- Quadriceps: Front thigh muscles.
How Many Calories Do Planks Burn?
Calorie burn varies based on weight and duration. On average, a person weighing 150 pounds burns about 3 to 4 calories per minute while holding a plank.
What Are the Benefits of Planking?
Planking builds core strength and stability, enhancing balance and coordination in daily activities. A strong core supports other physical activities and can help prevent lower back injuries.
By incorporating planks into your workout routine, you can significantly improve core strength and overall fitness. Whether you’re a beginner or looking for a challenge, planks offer versatile options to suit your needs. Remember to focus on proper form, avoid common mistakes, and adjust the exercise as necessary to prevent injury.
RELATED:
Got Wrist Pain? 6 Exercise Modifications That Can Help
No More Sit-Ups: 7 New Moves to Work Your Abs
7 Easy Ways to Improve Your Squat
Not a Daily Burn member? Sign up at dailyburn.com and start your free 30-day trial today.
Originally published on May 31, 2016. Updated on October 22, 2021
Photos by Ryan Kelly / Daily Burn. Cover image via Shutterstock